Ensure Plugins Quality
NativeScript plugins are the main building blocks for NativeScript applications. These building blocks should work properly installed into applications:
- built for Android
- built for iOS
Ignoring any of these non-functional requirements could lead to an app that doesn’t work as expected. Throughout this article we'll be referring to the verification of those requirements as 'sanity checks' without writing a single line of test.
Prerequisites
In order to ensure that your plugin runs reliably in any NativeScript application, there are certain prerequisites you may need to complete.
All plugins should have a demo folder that contains a demo application showing how the plugin works. If your plugin is a user interface plugin, and you need to test the plugin in both Angular and non-Angular apps, you should have an additional demo-angular folder containing an Angular app you can test your plugin in. Refer to the article "Supporting Angular in UI Plugins" for more details.
my-plugin
├── demo
├── demo-angular
└── src
     └── package.json
NOTE: It is very handy to have the plugin and demo application(s) in the same repository. The NativeScript official plugin seed defines this structure so if the plugin is based on it, the plugin’s source and the demo app are nicely organized.
In order to ease the process add the following scripts in your
package.json file under src folder
(the plugins source folder).
"ngc": "node --max-old-space-size=8192 ./node_modules/.bin/ngc"
NOTE In case the ngc command is not found, you need to install it:
npm install @angular/compiler-cli --save-dev
This script will initiate Ahead of Time (AOT) compilation. The
parameter max-old-space-size is a workaround to fix
heap out of memory errors when running node binaries. It's a
common issue when using TypeScript 2.1+ and the Angular compiler
(ngc). Check out this issue for more information -
https://github.com/angular/angular-cli/issues/5618.
NOTE The script above is needed only if the plugin implements some specific Angular wrappers for Angular support.
"build": "npm i && tsc && npm run ngc"
This script will install all NativeScript plugin’s dependencies, compile TypeScript files and initiate Ahead of Time (AOT) compilation.
NOTE The command
npm run ngcis needed only if the plugin implements some specific Angular wrappers for Angular support. If this is not the case, it can be removed.
"prepublishOnly": "npm run build"
In the package.json under your
demo and demo-angular folders add the
following script:
"build.plugin": "cd ../src && npm run build"
This script will be executed before the package is prepared and packed, only on npm publish. More details can be found in the npm-script documentation. This approach is important because it ensures the plugin’s TypeScript is compiled and the plugin’s required metadata is generated every time before publishing.
Refer to the package.json file of the nativescript-facebook plugin where these scripts are also added.
Checking for Readability, Maintainability, and Functionality Errors
TSLint is a great tool for static analysis of your plugin’s code. It will test the plugin for readability and maintainability as well as functionality errors based on customizable rules. A complete list with the available TSLint rules can be found in the tslint repository.
The official NativeScript plugin seed recommends TSLint rules defined in this tslint.json file.
my-plugin
├── demo
├── demo-angular
├── src
|    └── package.json
└── tslint.json
TSLint could be easily incorporated into any NativeScript plugin by following these steps:
- Add tslint.json file on root level.
-
Add the following script in your plugin’s
src/package.jsonfile.
"ci.tslint": "npm i && tslint '**/*.ts' --config '../tslint.json' --exclude '**/node_modules/**'"
This script executes the tslint command passing the
tslint rules defined in tslint.json file. The
installed node_modules will be excluded from the
static analysis. Having tslint.json on root level
allows using the same TSLint rules for both demo apps by adding
the same script.
Now the command npm run ci.tslint will start a
static analysis.
Checking in Application Built for Android and iOS
Perhaps the most important sanity checks is whether the demo application consuming the plugin can actually be built. NativeScript supports Android and iOS so both platforms should be covered. The recommendation is to build with latest SDK for Android and iOS.
The NativeScript command for building Android and iOS apps is:
tns build android and tns build ios
Read more details regarding building project with NativeScript CLI.
Automate All Checks with Travis CI
Travis CI is a great way to automate plugin’s sanity checks. It
is free for open-source projects. More details can be found in
Travis CI documentation. Travis CI will boot a virtual machine and execute commands
based on the provided configuration in your
.travis.yml file.
First things first! Add an empty .travis.yml file
on the root level of your plugin.
my-plugin
├── demo
├── demo-angular
├── src
|    └── package.json
├── tslint.json
└── .travis.yml
NOTE: If you use the NativeScript plugin seed, you have an initial
.travis.ymlfile setup.
This sample uses Build Matrix to initiate several runs as a result of one and Build Stages to separate the execution into stages. The flow will be as follows: 1. Test for Readability, Maintainability and Functionality Errors 2. Build Demo Apps with Your Plugin Installed
Each step starts after successful completion of the previous one. In this way, if there is a functional error, for example, the entire run will be terminated after the fall of the first step and the rest of the steps will not be executed. This behavior is controlled by Build Stages.
According to the
Build Lifecycle
of each Travis CI build, install is the right phase
to install any required dependencies.
Add following commands in the install phase in
.travis.yml file:
Install nativescript as a global node module.
- npm install -g nativescript
Configures anonymous usage reporting for the NativeScript CLI. Read more about CLI usage reporting.
- tns usage-reporting disable
Configures anonymous error reporting for the NativeScript CLI. Read more about CLI error reporting.
- tns error-reporting disable
As a result the install phase should be:
install:
    - npm install -g nativescript
    - tns usage-reporting disable
    - tns error-reporting disable
Refer to nativescript-facebook .travis.yml file to see this in reality.
As we mentioned earlier, the plugin should be sanity checked on
Android as well as on iOS. The Android specific requirements can
be defined in .travis.yml file in
android section:
android:
  components:
    - tools
    - platform-tools
    - build-tools-26.0.1
    - android-26
    - android-23
    - extra-android-m2repository
tools and platform-tools components
define that the latest revision of Android SDK Tools will be
installed. Read more about
Travis CI Environment for Android Project.
build-tools-26.0.1 component defines the BuildTools
version that will be used.
android-26 component defines the SDK version used
to compile the project.
extra-android-m2repository component defines the
support library repositories.
Let's add the required stages using the Build Matrix.
Add the following snippet at the beginning of
.travis.yml file:
matrix:
  include:
Then add the required stages:
1. Test for Readability, Maintainability and Functionality Errors
- stage: "Lint"
  language: node_js
  os: linux
  node_js: "10"
  script: cd src && npm run ci.tslint && cd ../demo && npm run ci.tslint && cd ../demo-angular && npm run ci.tslint
The machine that is going to be provisioned will be Linux with
nodejs v10 installed on it as well as OpenJDK v8. Finally the
ci.tslint script will be executed for the plugin's
code and for the demo apps.
2. Build Demo Apps with Your Plugin Installed
- stage: "Build"
  env:
    - BuildAndroid="26"
  language: android
  os: linux
  jdk: openjdk8
  before_install: nvm install 6.10.3
  script: cd demo && npm run ci.android.build && cd ../demo-angular && npm run ci.android.build
- os: osx
  env:
    - BuildiOS="11"
    - Xcode="9.1"
  osx_image: xcode9.1
  language: node_js
  node_js: "10"
  jdk: openjdk8
  script: cd demo && npm run ci.ios.build && cd ../demo-angular && npm run ci.ios.build
The scripts (ci.android.build and
ci.ios.build) that are executed to build for iOS
and Android are located in
package.json
file of any of the demo apps.
If everything is configured properly, the sanity checks will execute on every code change. The result, and whether the checks pass or not, will look like this:
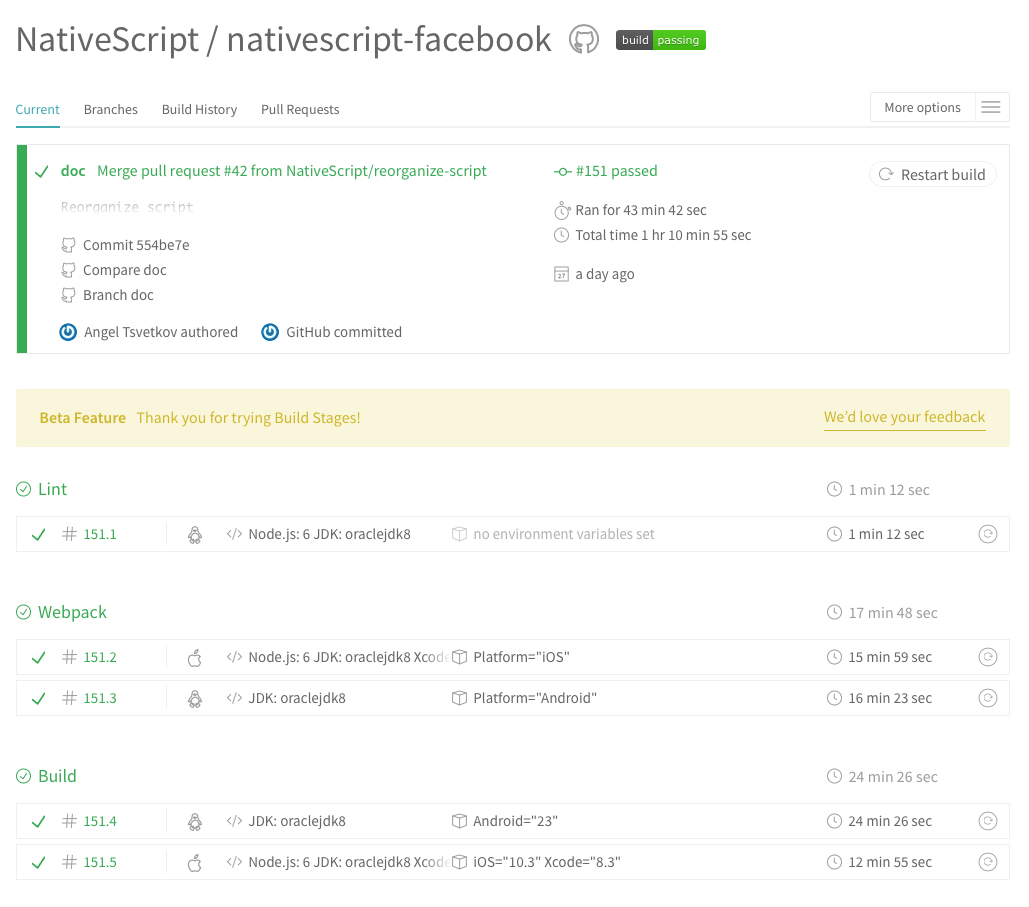
The main benefit of having sanity checks in place for your NativeScript plugins is that you can develop without spending additional time to ensure your changes don't break existing applications depending on your plugin.
Do not forget to add a Travis CI badge in your NativeScript plugin's project! It reports live status of your CI build and makes your plugin look more reliable.