RadCalendar Month View Styling
The Month view mode has the most complicated styling since there
are many different types of cells that are used to represent
different information to the user. In order to apply custom
style for this mode, you need to initialize the
monthViewStyle property of
RadCalendar with instance of
CalendarMonthViewStyle. The following image shows
the different UI elements that are customizable in this view
mode:
There are some properties that change the month view :
-
backgroundColor- a color that is applied as background color -
showTitle- determines if title should be shown -
showWeekNumbers- determines if week numbers should be shown -
showDayNames- determines if day names should be shown -
selectionShape- defines the decoration shape drawn in the center of a selected cell within the month view. Accepts values from theCalendarSelectionShapeenumeration -
selectionShapeSize- defines the size of the decoration shape drawn in the center of a selected cell within the month view. In case the shape isSquarethe property determines the side of the square draw. If the shape isRoundthe size determines the radius of the circle drawn -
selectionShapeColor- determines the color of the selection shape
In order to style any type of the available cell in calendar you
need to initialize the corresponding style property of
CalendarMonthViewStyle class, that is used for this
view mode:
-
dayCellStyle- defines styling of cells that represent a regular day in month/week. This is the default style that will be applied if the date is not special -
selectedDayCellStyle- defines styling of selected cells -
todayCellStyle- defines styling of the cell that shows the today date -
dayNameCellStyle- defines styling of cells with names of days -
weekNumberCellStyle- defines styling of cells with number of weeks -
weekendCellStyle- defines styling of cells that visualize days of the weekends -
titleCellStyle- defines styling for the calendar title with month name
There are two classes you should use to initialize these
properties: CalendarCellStyle and its inheritor
CalendarDayCellStyle. Properties
weekNumberCellStyle,
dayNameCellStyle and
titleCellStyle should be initialized with
CalendarCellStyle instance. Properties
dayCellStyle, todayCellStyle,
selectedDayStyle and
weekendCellStyle should be initialized with
CalendarDayCellStyle.
The CalendarCellStyle class has properties for
common styling options of any of the cells:
-
cellBorderWidth- defines the border width of the cell -
cellBorderColor- defines the border color of the cell -
cellBackgroundColor- defines the background color of the cell -
cellAlignment- defines the content alignment in the cell -
cellTextColor- defines the color for the text shown in the cell -
cellTextFontName- defines the name of the font you want to use. -
cellTextFontStyle- defines the style of the font used for text in cell. -
cellTextSize- defines the text size in cell -
cellPaddingHorizontal- defines the amount of horizontal padding -
cellPaddingVertical- defines the amount of vertical padding
The CalendarDayCellStyle extends this set with some
style properties specific to the date cells like:
-
showEventsText- defines if the events should be visualized with text and shape or with shape only -
eventTextColor- defines the color for the text of events shown in the date cell -
eventFontName- defines the name of the font you want to use for events text in date cell. -
eventFontStyle- defines the style of the font used for events text in date cell. -
eventTextSize- defines the size of the events text in date cell
Example
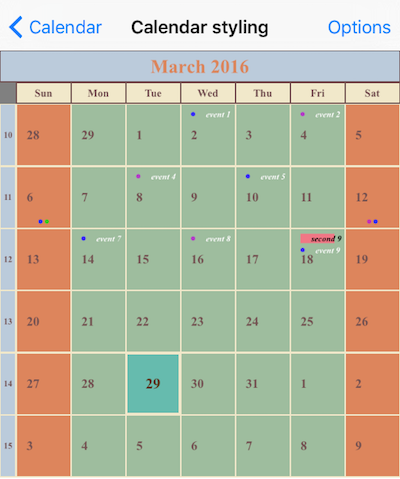
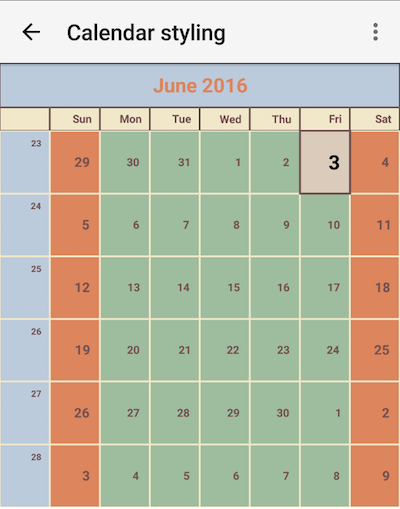
To better illustrate the usage of styling properties, we will use a simple scenario in which the cells are customized:
 <rc:RadCalendar.monthViewStyle>
    <rc:CalendarMonthViewStyle backgroundColor="Gray" showTitle="true" showWeekNumbers="true" showDayNames="true" >
        <rc:CalendarMonthViewStyle.todayCellStyle>
            <rc:DayCellStyle cellBackgroundColor="#66bbae" cellBorderWidth="2" cellBorderColor="#f1e8ca" cellTextColor="#5b391e" cellTextFontName="Times New Roman" cellTextFontStyle="Bold" cellTextSize="14" />
        </rc:CalendarMonthViewStyle.todayCellStyle>

        <rc:CalendarMonthViewStyle.dayCellStyle>
            <rc:DayCellStyle showEventsText="true" eventTextColor="White" eventFontName="Times New Roman" eventFontStyle="BoldItalic" eventTextSize="8"
                                    cellPaddingHorizontal="10" cellPaddingVertical="5" cellBackgroundColor="#9ebd9e"
                                    cellBorderWidth="1" cellBorderColor="#f1e8ca" cellTextColor="#745151" cellTextFontName="Times New Roman" cellTextFontStyle="Bold" ios:cellTextSize="12" android:cellTextSize="10"/>
        </rc:CalendarMonthViewStyle.dayCellStyle>

        <rc:CalendarMonthViewStyle.anotherMonthCellStyle>
            <rc:DayCellStyle showEventsText="true" eventTextColor="lightGray" eventFontName="Times New Roman" eventFontStyle="BoldItalic" eventTextSize="8"
                                    cellPaddingHorizontal="10" cellPaddingVertical="5" cellBackgroundColor="#9ebd9e"
                                    cellBorderWidth="1" cellBorderColor="#f1e8ca" cellTextColor="lightGray" cellTextFontName="Times New Roman" cellTextFontStyle="Bold" ios:cellTextSize="11" android:cellTextSize="10"/>
        </rc:CalendarMonthViewStyle.anotherMonthCellStyle>

        <rc:CalendarMonthViewStyle.disabledCellStyle>
            <rc:DayCellStyle showEventsText="true" eventTextColor="lightGray" eventFontName="Times New Roman" eventFontStyle="BoldItalic" eventTextSize="8"
                                    cellPaddingHorizontal="10" cellPaddingVertical="5" cellBackgroundColor="lightGray"
                                    cellBorderWidth="1" cellBorderColor="#f1e8ca" cellTextColor="darkGray" cellTextFontName="Times New Roman" cellTextFontStyle="Bold" ios:cellTextSize="11" android:cellTextSize="10"/>
        </rc:CalendarMonthViewStyle.disabledCellStyle>

        <rc:CalendarMonthViewStyle.weekendCellStyle>
            <rc:DayCellStyle eventTextColor="BlueViolet" eventFontName="Times New Roman" eventFontStyle="BoldItalic" eventTextSize="8"
                                    cellPaddingHorizontal="10" cellPaddingVertical="5" cellBackgroundColor="#dd855c"
                                    cellBorderWidth="1" cellBorderColor="#f1e8ca" cellTextColor="#745151" cellTextFontName="Times New Roman" cellTextFontStyle="Bold" cellTextSize="12" />
        </rc:CalendarMonthViewStyle.weekendCellStyle>

        <rc:CalendarMonthViewStyle.selectedDayCellStyle>
            <rc:DayCellStyle eventTextColor="Blue" eventFontName="Times New Roman" eventFontStyle="Bold" eventTextSize="8"
                                    cellPaddingHorizontal="10" cellPaddingVertical="5" cellBackgroundColor="#dbcbbb"
                                    cellBorderWidth="2" cellBorderColor="#745151" cellTextColor="darkGray" cellTextFontName="Times New Roman" cellTextFontStyle="Bold" cellTextSize="18" />
        </rc:CalendarMonthViewStyle.selectedDayCellStyle>

        <rc:CalendarMonthViewStyle.weekNumberCellStyle>
            <rc:CellStyle cellBackgroundColor="#bbcbdb" cellBorderWidth="1" cellBorderColor="#f1e8ca" cellTextColor="#745151" cellTextFontName="Times New Roman" cellTextFontStyle="Bold" cellTextSize="8" />
        </rc:CalendarMonthViewStyle.weekNumberCellStyle>

        <rc:CalendarMonthViewStyle.dayNameCellStyle>
            <rc:CellStyle  cellBackgroundColor="#f1e8ca" cellBorderWidth="1" cellBorderColor="#745151" cellTextColor="#745151" cellTextFontName="Times New Roman" cellTextFontStyle="Bold" cellTextSize="10" />
        </rc:CalendarMonthViewStyle.dayNameCellStyle>

        <rc:CalendarMonthViewStyle.titleCellStyle>
            <rc:CellStyle  cellBackgroundColor="#bbcbdb" cellBorderWidth="1" cellBorderColor="#745151" cellTextColor="#dd855c" cellTextFontName="Times New Roman" cellTextFontStyle="Bold" cellTextSize="18" />
        </rc:CalendarMonthViewStyle.titleCellStyle>

        <rc:CalendarMonthviewStyle.inlineEventCellStyle>
            <rc:InlineEventCellStyle cellBackgroundColor="LightPink" eventTextColor="Gold" eventFontName="Avenir" eventFontStyle="BoldItalic" eventTextSize="12"
                                    timeTextColor="DeepSkyBlue" timeFontName="Courier" timeFontStyle="Regular" timeTextSize="14"/>
        </rc:CalendarMonthviewStyle.inlineEventCellStyle>

    </rc:CalendarMonthViewStyle>
</rc:RadCalendar.monthViewStyle>
This is how the calendar looks like:


References
Want to see this scenario in action? Check our SDK examples repo on GitHub. You will find this and many other practical examples with NativeScript UI.
Related articles you might find useful: