RadListView Swipe Actions
The "Swipe Actions" feature allows you to implement actions associated with list items which are triggered by swiping the item left or right. For examples, you can organize a TO-DO application and let your users complete or delete to-do items by swiping them. Similar scenarios are also to be found in famous e-mail client apps. The "Swipe Actions" feature supports the use of interactive elements within the item being swiped, i.e. the main content of the item.
Here's an example of how the Swipe Actions behavior looks on Android and iOS:
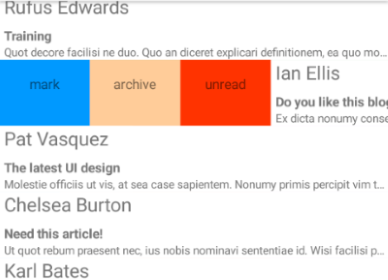
Please note that the items in this example have an explicitly set white background. When using swipe actions, your items should not be transparent, because otherwise the swipe content would be visible through them.
Enabling Swipe Actions in your RadListView
For this tutorial we will use the already familiar setup from the RadListView: Getting started section.
To enable the "Swipe Actions" functionality in
RadListView
you first need to set the
swipeActions
property to true.
Complete example
Here is a complete example of Swipe Actions:
export default {
  name: 'SwipeActions',
  description: description,
  template: `
  <Page>
    <ActionBar :title="title">
      <NavigationButton text="Back" android.systemIcon="ic_menu_back" @tap="onNavigationButtonTap"></NavigationButton>
    </ActionBar>
    <GridLayout orientation="vertical" rows="auto, *">
      <RadListView ref="listView"
                   for="item in itemList"
                   swipeActions="true"
                   @itemSwipeProgressStarted="onSwipeStarted">
        <v-template>
          <StackLayout class="item p-t-10" orientation="vertical">
            <Label :text="item.name" class="nameLabel"></Label>
            <Label :text="item.description" class="descriptionLabel"></Label>
          </StackLayout>
        </v-template>

        <v-template name="itemswipe">
          <GridLayout columns="auto, *, auto" backgroundColor="White">
            <StackLayout id="mark-view" col="0" class="swipe-item left"
                         orientation="horizontal" @tap="onLeftSwipeClick">
              <Label text="mark" verticalAlignment="center" horizontalAlignment="center"/>
            </StackLayout>
            <StackLayout id="delete-view" col="2" class="swipe-item right"
                         orientation="horizontal" @tap="onRightSwipeClick">
              <Label text="delete" verticalAlignment="center" horizontalAlignment="center" />
            </StackLayout>
          </GridLayout>
        </v-template>
      </RadListView>
    </GridLayout>
  </Page>
  `,
  data () {
    return {
      title: description,
      itemList: getItemList(20),
    };
  },

  methods: {
    onSwipeStarted ({ data, object }) {
      console.log(`Swipe started`);
      const swipeLimits = data.swipeLimits;
      const swipeView = object;
      const leftItem = swipeView.getViewById('mark-view');
      const rightItem = swipeView.getViewById('delete-view');
      swipeLimits.left = leftItem.getMeasuredWidth();
      swipeLimits.right = rightItem.getMeasuredWidth();
      swipeLimits.threshold = leftItem.getMeasuredWidth() / 2;
    },
    onLeftSwipeClick (event) {
      console.log('left action tapped');
      this.$refs.listView.notifySwipeToExecuteFinished();
    },
    onRightSwipeClick ({ object }) {
      console.log('right action tapped');
      // remove item
      this.itemList.splice(this.itemList.indexOf(object.bindingContext), 1);
      this.$refs.listView.notifySwipeToExecuteFinished();
    },
    onNavigationButtonTap() {
      Frame.topmost().goBack();
    },
  }
};
Swipe actions
In this scenario the user needs to swipe and release the item to
execute the corresponding action. The item must be swiped at a
given distance over the provided threshold so that the
associated action is executed. To implement this approach you
need to handle the following
RadListView
events:
-
itemSwipeProgressStartedEvent- used to specify the swipe limits in a way that will make the item return to its original place when released -
itemSwipeProgressEndedEvent- used to determine if a swipe action has to be executed (in case the item was swiped beyond a given threshold) -
itemSwipeProgressChangedEvent- in case you want to notify the user that they have swiped the item beyond a specified threshold and the swipe action will be executed
You can see that the width of the list control is used to
specify the threshold. The limits for the left and right edges
are defined to be half the size of the item (in this case we
take the measured width of the swipe-view that comes from the
comes from the itemswipe template). That means that
the user will never be able to swipe beyond the threshold and
once released - the item will always dock at its original
position. So what remains is to track the swipe progress using
the
itemSwipeProgressEndedEvent
and trigger the action when the swiped item passes a threshold
In this particular case we have decided that the threshold
beyond which an action is considered executed is 1/2 of the
whole item width (in this case we take the measured width of the
swipe-view that comes from the itemswipe template).
All swipe events exposed by
RadListView
provide you with a
ListViewEventData
object which in turn carries a
SwipeOffsets
object through its
data
property. This object exposes the following properties:
-
x- the X offset of the item being released after swiping -
y- the Y offset of the item being released after swiping -
swipeLimits- an instance of theSwipeLimitscontaining the dimensional limits which restrict the movement of the swiped item. Its properties are as follows:- top - determines how far from the top edge can an item can be swiped
- left - determines how far from the left edge can an item can be swiped
- right - determines how far from the right edge can an item can be swiped
- bottom - determines how far from the bottom edge can an item can be swiped
- threshold - determines the amount if pixels that needs to be surpassed in any swiping direction so that the item docks open at the provided swipe limit (left or right).
-
swipeView- theViewelement that represents the swipe content of beneath the item being swiped -
mainView- theViewelement representing the main content of the item being swiped
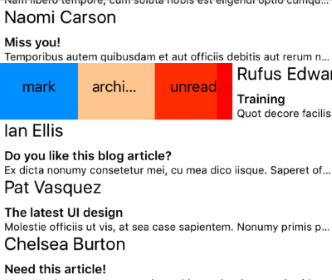
Here are two screenshots demonstrating the behavior on Android and iOS: