Code Splitting
When building a code-sharing app, you will share a big part of your code across all platforms. However, you will encounter situations where you need to provide different code for the web app and for the mobile app. The most common scenario is with Angular components, where you need to define different markup for your web and mobile apps.
There is a simple naming convention that allows you to provide two versions of the same file. All you need to do is create two files and add a .tns before the file extension to one of them, i.e.
- name.component.html - web-specific file
- name.component.tns.html - NativeScript-specific file
The file with the .tns part, is designated as a NativeScript-specific file, while the file without .tns is designated to be a web-only file.
TIP: You can use the naming convention with any file extension:
- file.tns.ts
- file.tns.html
- file.tns.css
- file.tns.scss
Web build
When you run ng serve, no .tns files will be bundled.
Or in different words:
.tns files are excluded from web builds.
NativeScript build
When you run tns run [ios|android], all .tns files will be bundled instead of the web files.
Or in different words:
.tns files replace the web files in the NativeScript builds.
iOS, Android, web files
While .tns is used for NativeScript-specific files, you can also create Android- and iOS-specific files. This is again done with a naming convention where .android is used for Android files and ios is used for iOS files.
- file.ts - web-specific file
- file.android.ts - android-specific file
- file.ios.ts - iOS-specific file
Angular Components
It’s important to understand code splitting in the context of an Angular Component.
The most common scenario is a component with the following file structure:
- name.component.ts - web + NativeScript shared file
- name.component.html - web UI file
- name.component.tns.html - NativeScript UI file
- name.component.css - web stylesheet
- name.component.tns.css- NativeScript stylesheet
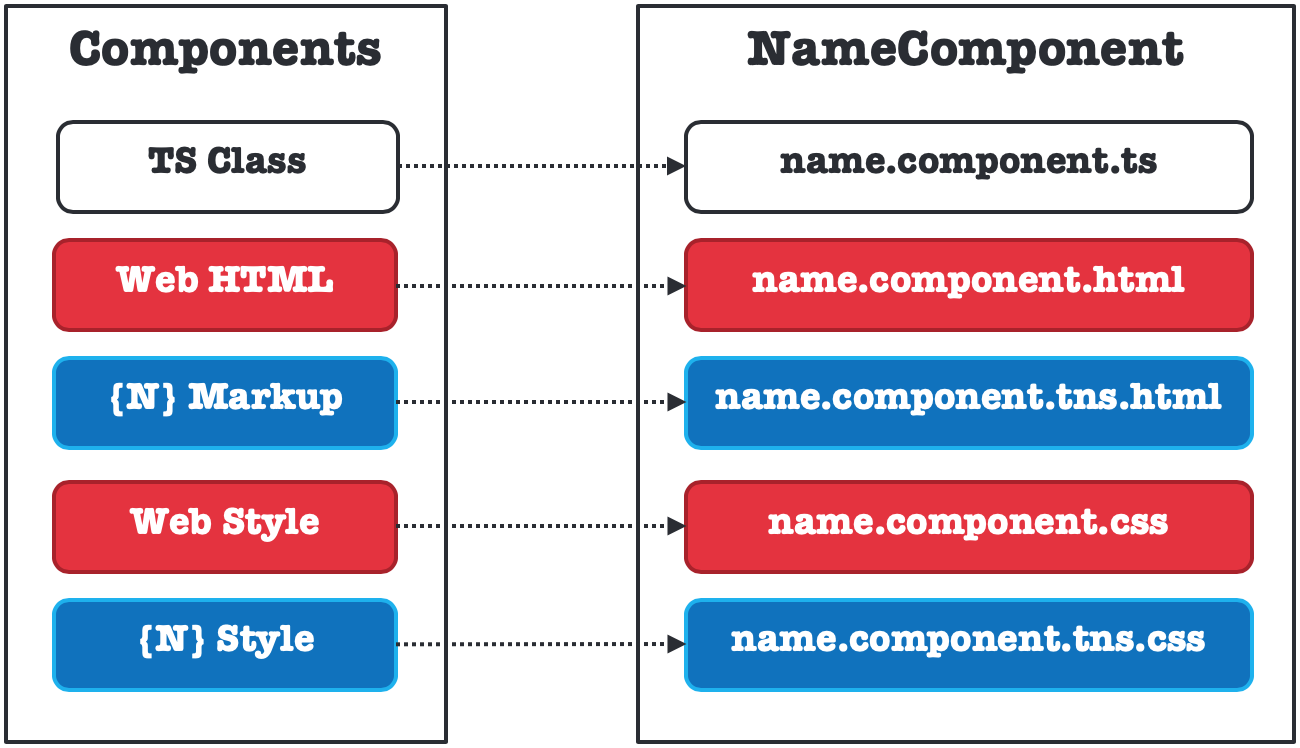
The important thing to note here is that the @Component decorator points to the files without the .tns extension.
@Component({
  selector: 'app-name',
  templateUrl: './name.component.html',
  styleUrls: ['./name.component.css']
})
export class NameComponent {}
This is because all .tns files are either ignored by the Web Build or they are renamed by the NativeScript Build.
Ng Modules
Code splitting is useful when working with NgModules, as often you need to import web- or NativeScript-specific modules.
HttpClient
For example, when you want to use HttpClient, in a web project you need to import HttpClientModule, while in a NativeScript project you need to import NativeScriptHttpClientModule.
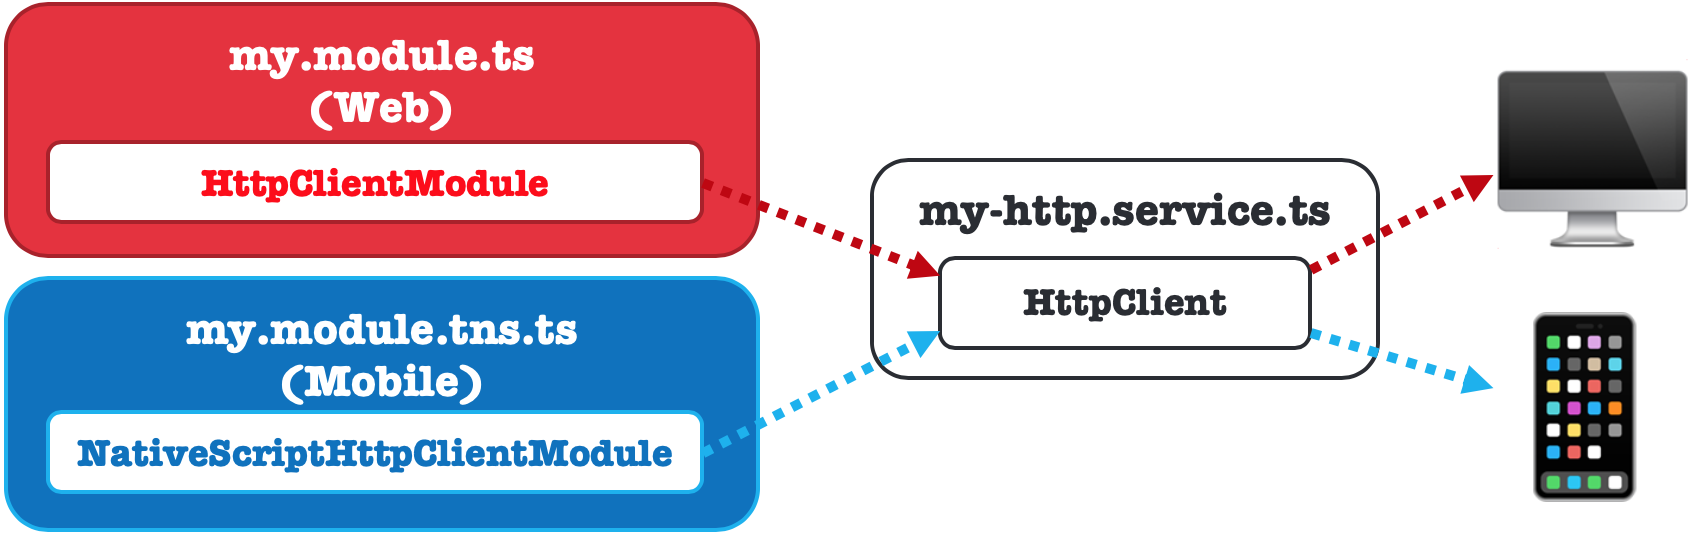
To achieve that create two files:
my.module.ts
import { HttpClientModule } from '@angular/common/http';

@NgModule({
  imports: [
    HttpClientModule
  ]
})
export class MyModule { }
my.module.tns.ts
import { NativeScriptHttpClientModule } from 'nativescript-angular/http-client';

@NgModule({
  imports: [
    NativeScriptHttpClientModule
  ]
})
export class MyModule { }
And then you will need only one version of the http-service, which will use the provided HttpClient:
my-http.service.ts
import { Injectable } from '@angular/core';
import { HttpClient } from '@angular/common/http';

@Injectable({
    providedIn: 'root'
})
export class MyHttpService {

  constructor(private http: HttpClient) { }

  public getData() {
    return this.http.get('get-data-request');
  }
}
UI libraries
Another example could be around using additional UI libraries. You could easily add Kendo UI and/or Angular Material to the web version of a NgModule, and separately, you could add NativeScript UI Pro to the NativeScript version of a NgModule.
Services
You can also, use NgModule splitting to provide two different implementations of the same service.
For example, you could have a Logger service, as the base class, and then two platform-specific versions of the Logger service: WebLogger and NativeScriptLogger.
Then in each module you could provide: Logger , and useClass: platform-specific Logger, like this:
my.module.ts
@NgModule({
  providers:[
    {
      provide: Logger,
      useClass: WebLogger,
    }
  ]
})
export class MyModule { }
my.module.tns.ts
@NgModule({
  providers:[
    {
      provide: Logger,
      useClass: NativeScriptLogger,
    }
  ]
})
export class MyModule { }
Note that this is only necessary if the class names of your services are different.
You can achieve the same by using the naming convention, i.e. my.service.ts and my.service.tns.ts.
Partial differences
Sometimes, you will be faced with situations where your component has multiple methods, of which one would require a platform-specific piece of code.
For example, you might need to add some code to grab an instance of RadSideDrawer and then show it or hide it.
@Component({...})
export class NameComponent {
  // a lot of shared code here

  public showMenu() {
    const sideDrawer = <RadSideDrawer>getRootView();
    drawer.showDrawer();
  }

  public hideMenu() {
    const sideDrawer = <RadSideDrawer>getRootView();
    drawer.closeDrawer();
  }
}
This code would make your web build fail.
Split components
One solution would be to have two versions of the same file (name.component.ts and name.component.tns.ts). With this approach you could easily add the platform-specific code to each file. However, this introduces unnecessary code duplication, which would make maintenance time consuming.
Helper file
A better solution is to create a helper pair of files, each with the platform-specific code.
drawer-helper.ts
export class DrawerHelper {

  public show() {
    // do nothing or add web implementation here
  }

  public hide() {
    // do nothing or add web implementation here
  }
}
drawer-helper.tns.ts
export class DrawerHelper {

  public show() {
    const sideDrawer = <RadSideDrawer>getRootView();
    drawer.showDrawer();
  }

  public hide() {
    const sideDrawer = <RadSideDrawer>getRootView();
    drawer.closeDrawer();
  }
}
And then call its functions from your component:
name.component.ts
import { DrawerHelper } from "@src/app/drawer-helper";

@Component({...})
export class NameComponent {
  // a lot of shared code here

  public showMenu() {
    DrawerHelper.show();
  }

  public hideMenu() {
    DrawerHelper.hide();
  }
}
Dependency Injection
The Angular way would be to split the web and
mobile functionality into two services:
drawer.service.ts
import { Injectable } from '@angular/core';

@Injectable()
export class DrawerService {

  public show() {
    // do nothing or add web implementation here
  }

  public hide() {
    // do nothing or add web implementation here
  }
}
drawer.service.tns.ts
import { Injectable } from '@angular/core';

@Injectable()
export class DrawerService {

  public show() {
    const sideDrawer = <RadSideDrawer>getRootView();
    drawer.showDrawer();
  }

  public hide() {
    const sideDrawer = <RadSideDrawer>getRootView();
    drawer.closeDrawer();
  }
}
And then in the component, add the service to the providers, and with the use of the Dependency Injection use the service to execute the platform-specific functionality:
name.component.ts
import { DrawerService } from "@src/app/drawer-service";

@Component({
  providers: [DrawerService]
})
export class NameComponent {
  // a lot of shared code here

  constructor(drawerService: DrawerService) {}

  public showMenu() {
    drawerService.show();
  }

  public hideMenu() {
    drawerService.hide();
  }
}