Introduction
Since the beginning of Angular (even back in the days when we were calling it Angular 2), you could use NativeScript with Angular to build mobile apps.
However, when you needed to build both a web and a native mobile app, you had to create two separate projects. However this has changed with the dawn of Schematics and ng add.
The Angular and NativeScript teams teamed up to create nativescript-schematics, a schematic collection that enables you to build both web and mobile apps from a single project.
Code-Sharing Projects
A code-sharing project is one where we keep the code for the web and mobile apps in one place. Here’s a quick diagram to show you what that looks like at a high level.
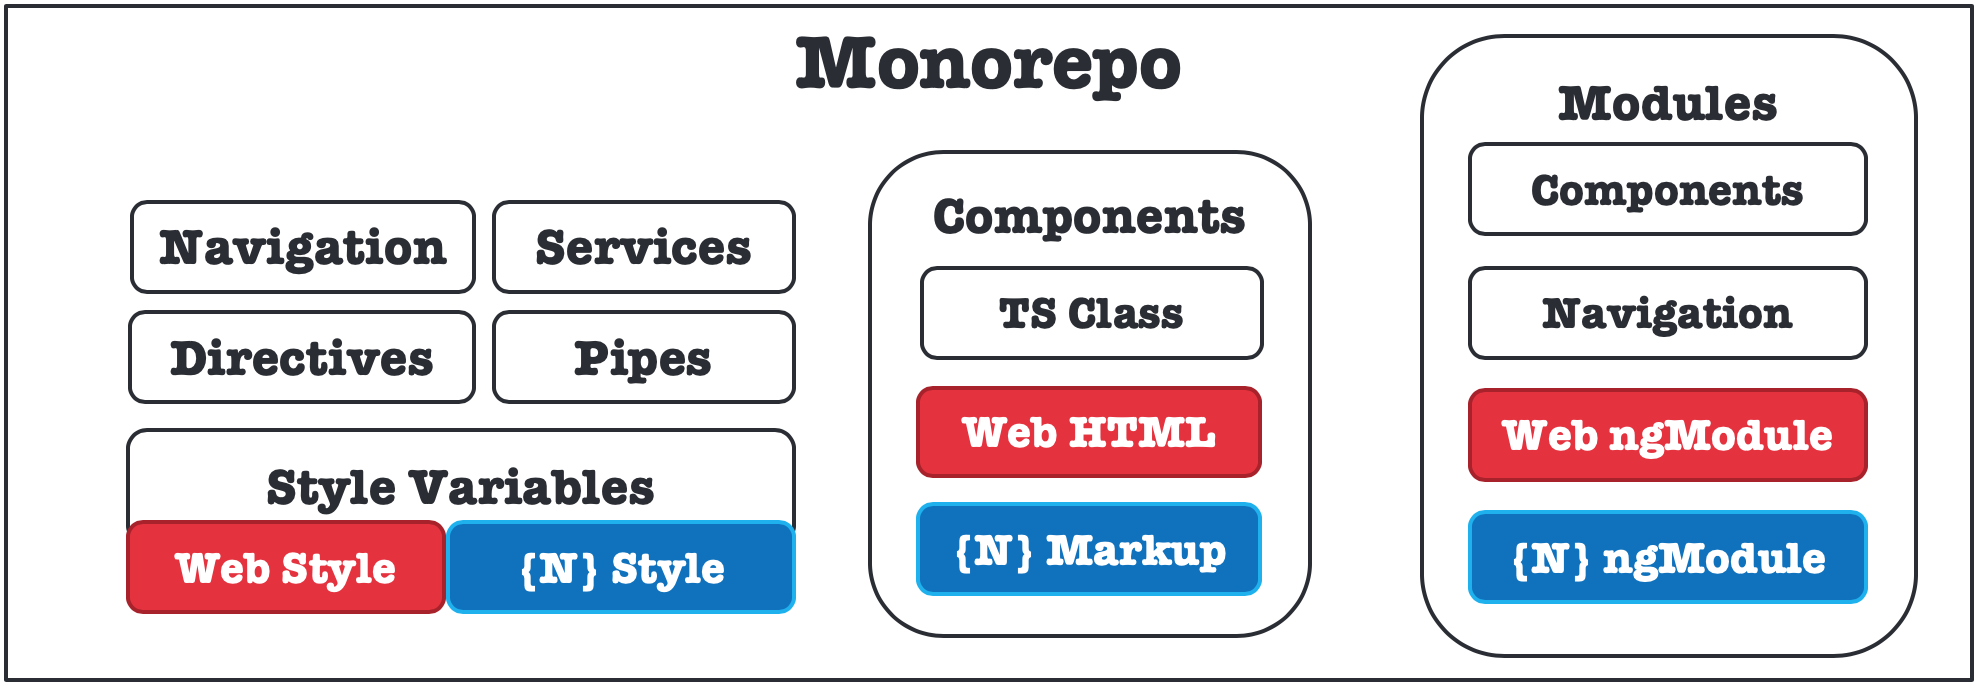
The objective is to share as much code as possible, and split the platform-specific code into separate files.
This usually means that we can share the code for:
- Routes for navigation,
- Services for common business logic,
- and Component Class definition for common behaviour of a component
While, splitting the code for:
- UI Layer (CSS and HTML) - as you need to use different user interface components in web and NativeScript-built native apps,
- and NgModules - so that you can import platform-specific modules, without creating conflicts (e.g. Angular Material Design - which is web only) between web and mobile.
Example: A Shopping Basket
For example in order to add a shopping basket to an online store, you would need:
- a Basket Service,
- a Payment Service and
- a Basket Component
Like in this diagram:
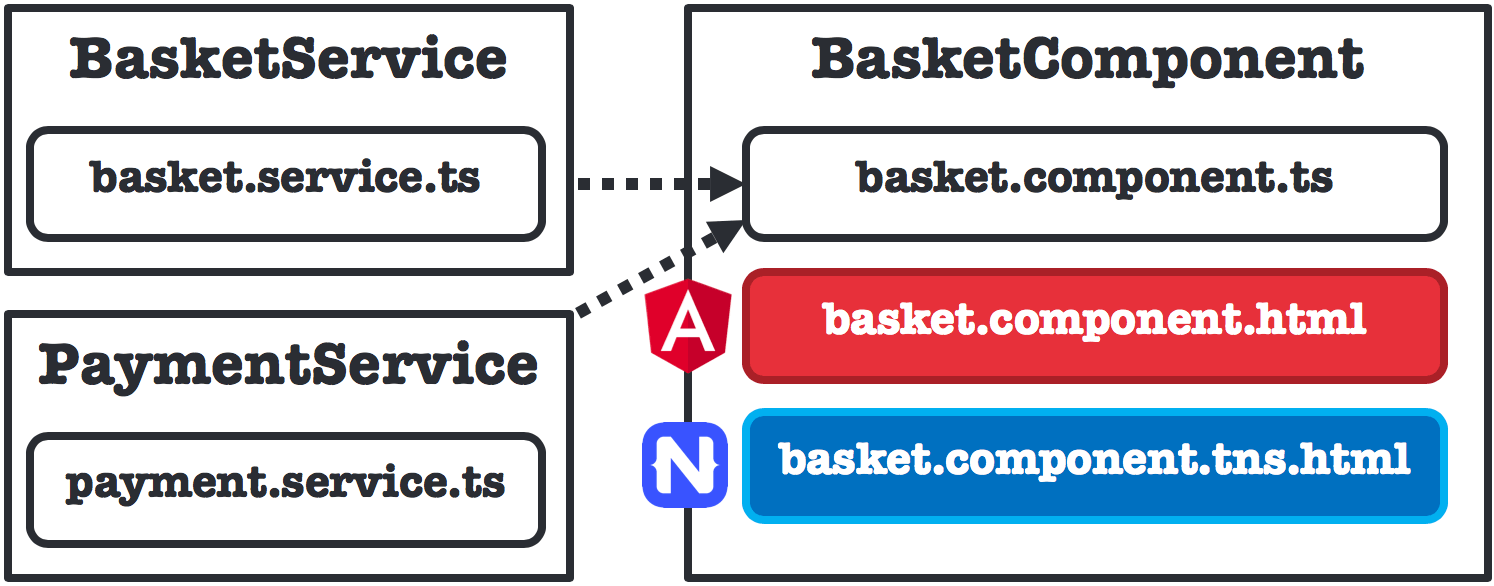
The BasketService should allow you to:
- loadItems - get items placed in the basket
- updateItemQuantity - change the quantity of a given item in the basket
- remove - remove a given item from the basket
The Basket Service should be made of 100% shareable code.
basket.service.ts
import { Injectable } from '@angular/core';
import { HttpClient } from '@angular/common/http';

import { Item } from '@src/app/item.model.ts';

@Injectable({
    providedIn: 'root'
})
export class BasketService {

  constructor(private http: HttpClient) { }

  public loadItems(): Observable<Items[]> {
    return this.http.get('get-data-request');
  }

  public updateItemQuantity(itemId: number, quantity: number) {
    // update item quantity code
  }

  public remove(itemId: number) {
    // remove item code
  }
}
payment.service.ts
The PaymentService - should allow you to:
- processOneClickPayment - process a payment using user's default card
Again, the PaymentService should be made of 100% shareable code
import { Injectable } from '@angular/core';

@Injectable()
export class PaymentService {
  public processOneClickPayment() {
    // Payment code
  }
}
Next, you would need to create a component, that would inject the Basket and the Payment services, and allow users to:
- see what is in the basket,
- update the quantity of its contents and
- buy the items.
One more time, the behaviour and the code of the BasketComponent should be 100% shared.
basket.component.ts
@Component()
export class BasketComponent implements onInit {
  items$: Observable<Item[]>;

  constructor(
    basketService: BasketService,
    paymentService: PaymentService
  ) { }

  public ngOnInit() {
    this.items = this.basketService.loadItems();
  }

  public increaseQuantity(item: Item) {
    this.basketService.updateItemQuantity(item.id, item.quantity + 1);
  }

  public decreaseQuantity(item: Item) {
    if (item.quantity > 1) {
      this.basketService.updateItemQuantity(item.id, item.quantity - 1);
    } else {
      this.removeItem(item);
    }
  }

  public removeItem(item: Item) {
    this.basketService.remove(item.id);
  }

  public pay() {
    this.paymentService.processOneClickPayment();
  }
}
The final bit is the implementation of the view templates. Both, templates should:
- display a list of items - their name and quantity,
- allow to increase or decrease the quantity of an item,
- remove an item and
- allow to process the payment
In this case the UI for the web and mobile apps is going to be different, and as a result the template code cannot be shared. However, everything underneath that drives its behaviour is still shared.
To create two separate templates, you just need to use a naming convention. Simply create two files:
- basket.component.html - the web template file,
- basket.component.tns.html - the NativeScript template file - it is the .tns that makes it a {N} file.
basket.component.html
<div>
  <h1>Basket</h1>
  <div *ngFor="let item of items$ | async">
    <h3></h3>
    <h4></h4>
    <button (click)="increaseQuantity(item)">➕</button>
    <button (click)="decreaseQuantity(item)">➖</button>
    <button (click)="removeItem(item)">🗑</button>
  <div>
  <button (click)="pay()">BUY NOW💰</button>
</div>
basket.component.tns.html
<ActionBar title="Basket"></ActionBar>
<StackLayout>
  <ListView [items]="items$ | async">
    <ng-template let-item="item">
      <GridLayout columns="*, auto, auto, auto, auto">
        <Label [text]="item.name"></Label>
        <Label [text]="item.quantity" col="1"></Label>
        <Button [text]="➕" (tap)="increaseQuantity(item)"></Button>
        <Button [text]="➖" (tap)="decreaseQuantity(item)"></Button>
        <Button [text]="🗑" (tap)="removeItem(item)"></Button>
      </GridLayout>
    </ng-template>
  </ListView>

  <Button text="BUY NOW💰" (tap)="pay()"></Button>
</StackLayout>
Even though, the contents of basket.component.html and basket.component.tns.html are not quite the same, you can see that in general they follow the same structure. Both use the async pipe to load the data from items$ and both use the component methods (increaseQuantity(item), pay()).
Remapped imports
It's strongly recommended to use remapped import statements in code-sharing projects. Don't worry if you are not familiar with the term - it was coined by the NativeScript team during the development of the NativeScript Angular code-sharing project structure. The remapped import statements are TypeScript import statements in the following form:
import { AppComponent } from '@src/app/app.component';
Notice the module specifier:
'@src/app/app.component'
In a code-sharing project, the TypeScript compiler is configured
to understand the @src symbol. Depending on the
platform you're building for - web or mobile, the compiler will
use one of two configuration files. Let's take a look into the
configuration file for web:
tsconfig.app.json
"compilerOptions": {
  "baseUrl": ".",
  "paths": {
    "@src/*": [
      "src/*.web.ts",
      "src/*.ts"
    ]
  }
}
...
This tells the compiler for any
module specifier that matches the pattern
"@src/*" (i.e. starts with "@src"), to
look in two locations:
-
"src/*.web.ts": meaning the web-specific file, i.e.@src/app/app.component=>./src/app/app.component.web.ts; -
"src/*.ts": meaning the module name unchanged, i.e.@src/app/app.component=>./src/app/app.component.ts.
The configuration for mobile is similar:
tsconfig.tns.json
"compilerOptions": {
  "baseUrl": ".",
  "paths": {
    "@src/*": [
      "src/*.tns.ts",
      "src/*.ts"
    ]
  }
}
...
Again, the platform-specific files are preferred during resolution:
-
"src/*.tns.ts": meaning the NativeScript-specific file, i.e.
@src/app/app.component=>./src/app/app.component.tns.ts; -
"src/*.ts": meaning the module name unchanged, i.e.
@src/app/app.component=>./src/app/app.component.ts.
You can also use
*.androidand*.iosfiles to split any platform-specific logic. Their resolution is handled by webpack during build.
Lazy Loaded Modules
You need to use remapped imports when configuring lazy loaded modules as well.
Dynamic imports
Since Angular 8.0, you can use dynamic imports in your routing configuration. The import path should be a remapped import.
const routes: Routes = [
  {
    path: 'lazy',
    loadChildren: () => import('@src/app/lazy/lazy.module').then(m => m.LazyModule),
  }
];
Static strings
If you decide to stick to static strings for the paths of the lazy loaded modules, make sure they are also following the same format:
const routes: Routes = [
  {
    path: 'lazy',
    loadChildren: '@src/app/lazy/lazy.module#LazyModule',
  }
];
However, in this case, the build process won't detect automatically the module file. You have to include it manually in the TypeScript compilation. Update the necessary configuration TypeScript configuration files.
-
If the module is mobile-only, update the mobile configuration:
tsconfig.tns.json
{ ... "files": [ "src/main.tns.ts", "src/app/lazy/lazy.module.tns.ts" ] } -
If the module is web-only, update the web configuration file:
tsconfig.app.json
{ ... "files": [ "src/main.ts", "src/polyfills.ts", "src/app/lazy/lazy.module.ts" ] } -
If the module is shared, update both configuration files:
tsconfig.tns.json
{
  ...
  "files": [
    "src/main.tns.ts",
    "src/app/lazy/lazy.module.ts"
  ]
}
tsconfig.app.json
{
  ...
  "files": [
    "src/main.ts",
    "src/polyfills.ts",
    "src/app/lazy/lazy.module.ts"
  ]
}
What’s next?
Read about Creating a New Project to get started.