Navigation
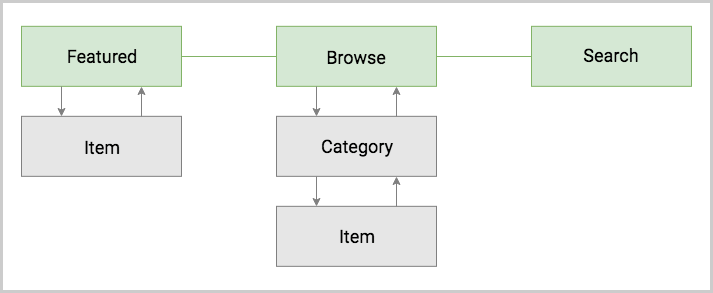
Navigation refers to the act of moving around the screens of your application. Each mobile app has its own unique navigation schema based on the information it tries to present. The schema below is an example of a common mobile navigation scenario.
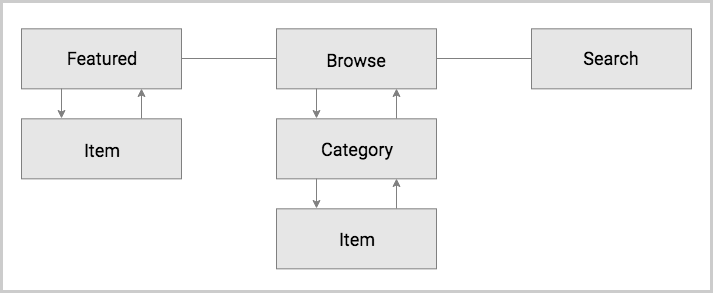
Based on the schema, there are three distinct navigational directions a user can move in:
- Forward - refers to navigating to a screen on the next level in the hierarchy.
- Backward - refers to navigating back to a screen either on the previous level in the hierarchy or chronologically.
- Lateral - refers to navigating between screens on the same level in the hierarchy.
This article demonstrates how you can implement these in NativeScript and combine them to build the navigation architecture of your application.
Forward Navigation
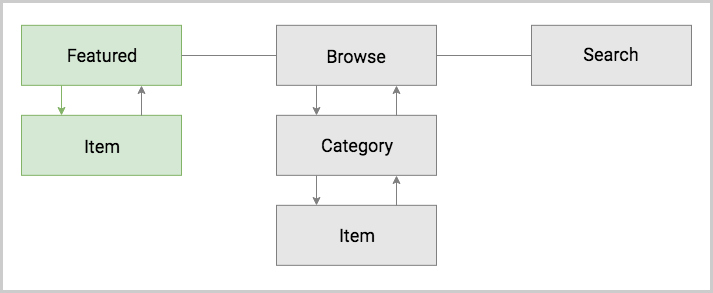
Forward navigation can be also called downward navigation since
you are going down in your navigation hierarchy. There are two
navigation components in NativeScript that enable implementing
forward navigation - Frame and Page. A
Frame represents a navigation controller that
navigates through Page instances.
Page
The Page is NativeScript's most basic navigation
component. It represents a screen that the user can navigate to.
This component serves two important roles. It holds the UI
components of a single screen and provides navigation lifecycle
events. For complete information regarding the
Page component, check out its dedicated
article.
By design, a Page can't be declared as a child of
another component. It is used as a root component of a module,
in which case the module becomes a page module. Here is an
example of how you can implement the
item-page module from the diagram above:
<Page loaded="onPageLoaded">
    <ActionBar title="Item" class="action-bar"></ActionBar>

    <StackLayout>
        <Label text="Item Details"/>
    </StackLayout>
</Page>
export function onPageLoaded(args) {
    console.log("Page Loaded");
}
import { EventData } from "@nativescript/core";

export function onPageLoaded(args: EventData): void {
    console.log("Page Loaded");
}
Frame
To display a Page on the screen, you need to
navigate to it using the Frame component. This
component is the main provider of forward and backward
navigation in NativeScript. The Frame component has
no visible representation. It simply provides a container for
transitions between pages. It also provides a navigation API
which includes history manipulation and setting custom
navigation transitions. For more information on the
Frame component and its API, visit this
article.
For the most basic forward navigation scenario, you need only these two features:
- defaultPage attribute - use this attribute to declare the initial page module that is displayed.
- navigate() method - use this method to force a navigation to another page module.
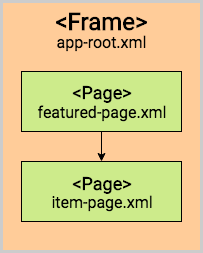
The following example demonstrates the implementation of the
rest of the forward navigation diagram above. There is a
Frame declared as root component in the
app-root module. Upon load, the
Frame will automatically navigate to the
featured-page module. The
featured-page module in turn has a button that
navigates to the item-page module. Check out the
complete playground demo below the code sample.
<Frame id="featured" defaultPage="featured-page" />
<Page>
    <ActionBar title="Featured" class="action-bar"></ActionBar>

    <StackLayout>
        <Button text="navigate('item-page')" tap="onTap"/>
    </StackLayout>
</Page>
export function onTap(args) {
    const button = args.object;
    const page = button.page;
    page.frame.navigate("item-page");
}
import { EventData, Button, Page } from "@nativescript/core";

export function onTap(args: EventData) {
    const button: Button = <Button>args.object;
    const page: Page = button.page;
    page.frame.navigate("item-page");
}
Backward Navigation
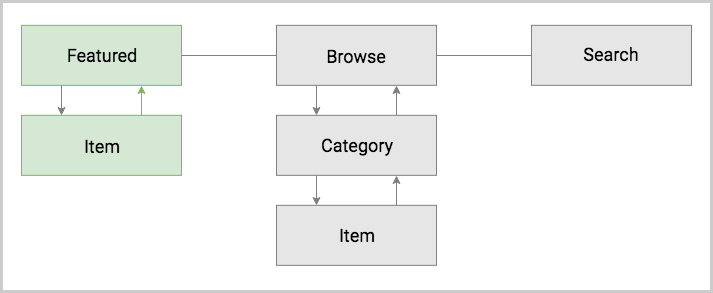
It can also be called upward navigation since you are going up
in your navigation hierarchy. This type of navigation represents
the opposite direction of the forward navigation and is
supported by the Frame API. To force a navigation
back to the previous page module loaded in a
Frame simply call its
goBack()
method. Check out the complete playground demo below the code
sample.
<Page loaded="onPageLoaded">
    <ActionBar title="Item" class="action-bar"></ActionBar>

    <StackLayout>
        <Label text="Item Details"/>
        <Button text="goBack()" tap="onTap"/>
    </StackLayout>
</Page>
export function onPageLoaded(args) {
    console.log("Page Loaded");
}

export function onTap(args) {
    const button = args.object;
    const page = button.page;
    page.frame.goBack();
}
import { EventData, Button, Page } from "@nativescript/core";

export function onPageLoaded(args: EventData): void {
    console.log("Page Loaded");
}

export function onTap(args: EventData) {
    const button: Button = <Button>args.object;
    const page: Page = button.page;
    page.frame.goBack();
}
Note: Both the Android hardware button and the iOS back button in the
ActionBarexecute upward navigation. These platform specific navigation controls come out of the box and there is no need for you to implement them yourself.
Lateral Navigation
Implementing lateral navigation in NativeScript usually means to
incorporate several instances of the
Frame component in your navigation and provide
means to the user to switch between them. This is usually
enabled through specific navigation components. These include
BottomNavigation, Tabs,
TabView, SideDrawer,
Modal View, and even Frame each
providing a unique mobile navigation pattern.
Hub Navigation
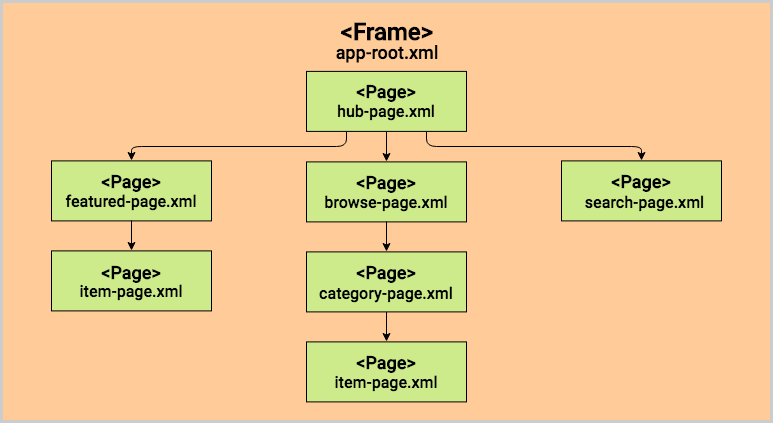
The most simple and straight forward way to implement lateral
navigation is the hub navigation pattern. It consists of a
screen, called a hub, that holds navigation buttons leading to
different features. In essence, this pattern uses the same
mechanism of forward navigation for lateral navigation. In
NativeScript you can implement this with a
Frame and have one Page serve as the
hub screen.
<Page class="page">
    <ActionBar title="Hub" class="action-bar">
    </ActionBar>

    <StackLayout>
        <Button text="navigate('featured-page')" tap="navigateToFeatured" />
        <Button text="navigate('browse-page')" tap="navigateToBrowse" />
        <Button text="navigate('search-page')" tap="navigateToSearch" />
    </StackLayout>
</Page>
export function navigateToFeatured(args) {
    const button = args.object;
    const page = button.page;
    page.frame.navigate("featured-page");
}

export function navigateToBrowse(args: EventData) {
    const button = args.object;
    const page = button.page;
    page.frame.navigate("browse-page");
}

export function navigateToSearch(args: EventData) {
    const button = args.object;
    const page = button.page;
    page.frame.navigate("search-page");
}
import { EventData, Button, Page } from "@nativescript/core";

export function navigateToFeatured(args: EventData) {
    const button: Button = <Button>args.object;
    const page: Page = button.page;
    page.frame.navigate("featured-page");
}

export function navigateToBrowse(args: EventData) {
    const button: Button = <Button>args.object;
    const page: Page = button.page;
    page.frame.navigate("browse-page");
}

export function navigateToSearch(args: EventData) {
    const button: Button = <Button>args.object;
    const page: Page = button.page;
    page.frame.navigate("search-page");
}
BottomNavigation & Tabs Navigation
The BottomNavigation and
Tabs components enable the user to arbitrarily
navigate between several UI containers at the same level. A key
feature of these components is that they keep the state of the
containers that are not visible. This means that when the user
comes back to a previous tab, the data, scroll position and
navigation state should be like they left them. Here is a
diagram that demonstrates how the navigation schema can be
implemented with a BottomNavigation or
Tabs.
Note: The example below utilizes the
BottomNavigationcomponent but you can use the same structure with theTabscomponent. For detailed information about these components, see the dedicated articles -BottomNavigationandTabs.
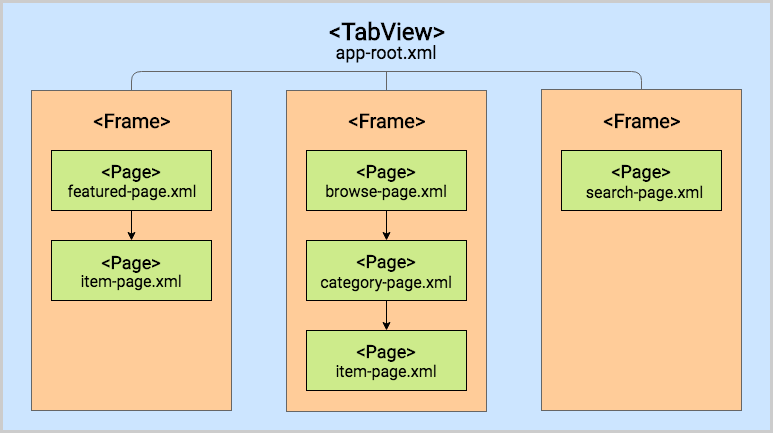
The BottomNavigation container provides its lateral
navigation logic automatically by providing the user with tabs
which they can select. To set up a
BottomNavigation you need to simply declare the UI
of each container (within a TabContentItem) and the
title and icon you want to be shown in its representing tab
(within a TabStripItem). Each separate UI container
is represented by a TabContentItem. A
TabContentItem can have one root component. As with
other containers, you can enable forward and backward navigation
inside each TabContentItem by embedding a
Frame in it.
The BottomNavigation provides two important
features connected to lateral navigation:
- selectedIndex property - use this property to programmatically navigate between the tabs.
- selectedIndexChanged event - use this event to handle navigations between tabs done by the user.
Check out the BottomNavigation article for a more detailed look on how you can use and customize the component.
Here is a code sample of the
BottomNavigation declaration that matches the
diagram above. Check out the complete playground demo below the
code sample.
<BottomNavigation id="bottomNav" automationText="tabNavigation" selectedIndex="0" selectedIndexChanged="onSelectedIndexChanged">
<TabStrip>
<TabStripItem>
<Image src="font://" class="fas"></Image>
<Label text="Featured"></Label>
</TabStripItem>
<TabStripItem>
<Image src="font://󲴡" class="fas"></Image>
<Label text="Browse"></Label>
</TabStripItem>
<TabStripItem>
<Image src="font://" class="fab"></Image>
<Label text="Search"></Label>
</TabStripItem>
</TabStrip>
<TabContentItem>
<Frame id="featured" defaultPage="featured-page"></Frame>
</TabContentItem>
<TabContentItem>
<Frame id="browse" defaultPage="browse-page"></Frame>
</TabContentItem>
<TabContentItem>
<Frame id="search" defaultPage="search-page"></Frame>
</TabContentItem>
</BottomNavigation>
export function onSelectedIndexChanged(args) {
    console.log(`Selected index has changed ( Old index: ${args.oldIndex} New index: ${args.newIndex} )`);
}
import { SelectedIndexChangedEventData } from "@nativescript/core";

export function onSelectedIndexChanged(args: SelectedIndexChangedEventData) {
    console.log(`Selected index has changed ( Old index: ${args.oldIndex} New index: ${args.newIndex} )`);
}
Note: In the current scenario the Search feature has only one page and it's possible to implement it directly in the
TabContentItemwithout embedding aFrame. However, in this case there won't be a navigation controller in theTabContentItemand therefore, noActionBar.
Modal View Navigation
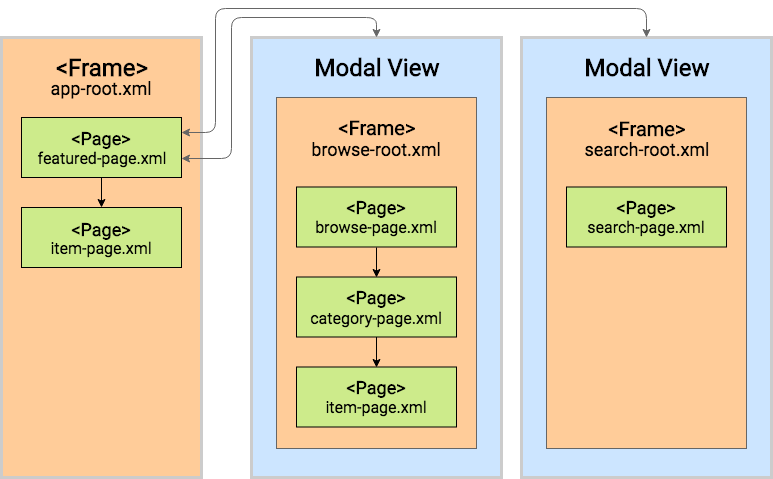
Opening a new Frame as a full screen modal view is
a very common mobile navigation pattern. In this context opening
the modal view represents lateral navigation to a new feature.
You can then leverage the embedded Frame to
navigate forward and backward in this feature. Closing the modal
will navigate laterally back to where the modal view was opened
from. Below is a diagram that displays how the navigation schema
can be implemented using modal views.
Note: Unlike the
BottomNavigationorTabscomponent, the state of the modal view isn't kept when navigating away, i.e. closing the modal.
Each UI component in NativeScript provides two methods for managing modal views:
-
showModal()
- opens a modal view on top of the
Pagethe UI component is part of. - closeModal() - closes the modal view that the UI component is part of.
To open a modal view you should simply call the
showModal() method of any UI component instance
with a path to the modal root module as parameter. Take a look
at the Modal View article for more
information.
The following code sample demonstrates how you can implement the Search modal view and page from the diagram above. Check out the complete playground demo below the code sample.
<Frame id="featured" defaultPage="featured-page" />
<Page>
    <ActionBar title="Featured" class="action-bar"></ActionBar>

    <StackLayout>
        <Button text="showModal('search-root', context, closeCallback, fullscreen)" tap="openSearchModal"/>
    </StackLayout>
</Page>
export function openSearchModal(args) {
    const view = args.object;
    const context = null;
    const closeCallback = null;
    const fullscreen = true;
    view.showModal("search-root", context, closeCallback, fullscreen);
}
import { EventData, View } from "@nativescript/core";

export function openSearchModal(args: EventData) {
    const view: View = <View>args.object;
    const context = null;
    const closeCallback = null;
    const fullscreen = true;
    view.showModal("search-root", context, closeCallback, fullscreen);
}
<Frame id="search" defaultPage="search-page" />
<Page>
    <ActionBar title="Search" class="action-bar"></ActionBar>

    <StackLayout>
        <Button text="closeModal()" tap="closeModal"/>
    </StackLayout>
</Page>
export function closeModal(args) {
    const view = args.object;
    view.closeModal();
}
import { EventData, View } from "@nativescript/core";

export function closeModal(args: EventData) {
    const view: View = <View>args.object;
    view.closeModal();
}
Note: In the current scenario the Search feature has only one page and it's possible to implement it directly in the modal view without embedding a
Frameinsearch-root. However, in this case there won't be a navigation controller in the modal view and therefore, noActionBar.
SideDrawer Navigation
The SideDrawer component is part of
NativeScript UI's built-in components. It enables the user to open a hidden view, i.e. drawer,
containing navigation controls, or settings from the sides of
the screen. There are a lot of navigation patterns that can be
implemented using a SideDrawer. A typical usage
would be to add UI controls and have them do one of two things:
-
Forward navigation - get a reference to a navigation
Frameand navigate in it. - Lateral navigation - open a modal view.
The simplest navigation pattern that you can implement is again
the hub navigation pattern, but this time with the
SideDrawer serving as the hub.
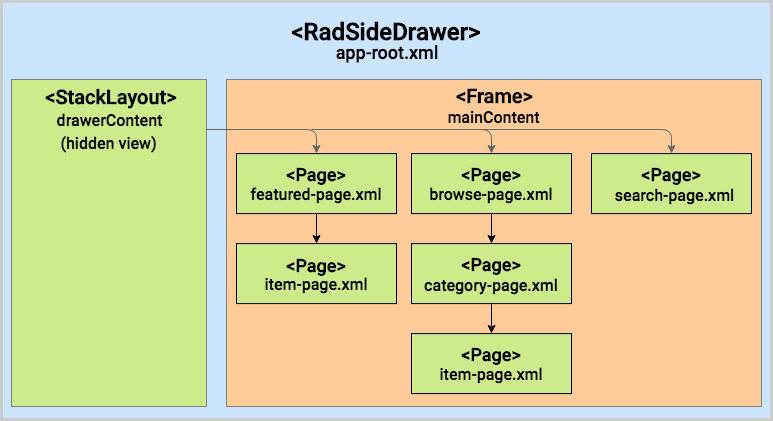
The component itself doesn't provide navigation logic
automatically like the Tabs. Instead, it is built
with more freedom in mind and lets you customize its content. It
exposes two UI containers - the
drawerContent container houses the UI of the hidden
side view and the mainContent holds the UI that
will be shown on the screen. To implement the diagram above, you
can embed a Frame component in the main content
container. In this case the hub screen will be hidden to the
side, so you will have to show one of the features initially
using the defaultPage property, e.g. the
featured-page module. In the hidden drawer content
you can have three buttons. Each of them will navigate to one of
the three features. Check out the complete playground demo below
the code sample.
<nsDrawer:RadSideDrawer xmlns:nsDrawer="nativescript-ui-sidedrawer">
    <nsDrawer:RadSideDrawer.drawerContent>
        <StackLayout backgroundColor="gray">
            <Button text="Featured" tap="navigateToFeatured" />
            <Button text="Browse" tap="navigateToBrowse" />
            <Button text="Search" tap="navigateToSearch" />
        </StackLayout>
    </nsDrawer:RadSideDrawer.drawerContent>

    <nsDrawer:RadSideDrawer.mainContent>
        <Frame id="root" defaultPage="featured-page" />
    </nsDrawer:RadSideDrawer.mainContent>
</nsDrawer:RadSideDrawer>
import { Application, Frame } from "@nativescript/core";

export function navigateToFeatured(args) {
    const sideDrawer = Application.getRootView();
    const featuredFrame = Frame.getFrameById("root");
    featuredFrame.navigate({
        moduleName: "featured-page",
        clearHistory: true
    });
    sideDrawer.closeDrawer();
}

export function navigateToBrowse(args) {
    const sideDrawer = Application.getRootView();
    const featuredFrame = Frame.getFrameById("root");
    featuredFrame.navigate({
        moduleName: "browse-page",
        clearHistory: true
    });
    sideDrawer.closeDrawer();
}

export function navigateToSearch(args) {
    const sideDrawer = Application.getRootView();
    const featuredFrame = Frame.getFrameById("root");
    featuredFrame.navigate({
        moduleName: "search-page",
        clearHistory: true
    });
    sideDrawer.closeDrawer();
}
import { RadSideDrawer } from "nativescript-ui-sidedrawer";
import { Application, Frame, View, EventData } from "@nativescript/core";

export function navigateToFeatured(args: EventData) {
    const sideDrawer: RadSideDrawer = <RadSideDrawer>getRootView();
    const featuredFrame = getFrameById("root");
    featuredFrame.navigate({
        moduleName: "featured-page",
        clearHistory: true
    });
    sideDrawer.closeDrawer();
}

export function navigateToBrowse(args: EventData) {
    const sideDrawer: RadSideDrawer = <RadSideDrawer>getRootView();
    const featuredFrame = getFrameById("root");
    featuredFrame.navigate({
        moduleName: "browse-page",
        clearHistory: true
    });
    sideDrawer.closeDrawer();
}

export function navigateToSearch(args: EventData) {
    const sideDrawer: RadSideDrawer = <RadSideDrawer>getRootView();
    const featuredFrame = getFrameById("root");
    featuredFrame.navigate({
        moduleName: "search-page",
        clearHistory: true
    });
    sideDrawer.closeDrawer();
}
Note: To implement the lateral navigation schema correctly in this case, we had to navigate to each side feature using the
clearHistoryoption. This is to ensure that there will be no forward and backward navigation between features.
An alternative navigation pattern for the
SideDrawer would be to have the main content hold
only one feature and navigate to the other two laterally using
modal views. See the playground demo below the code sample for
complete example.
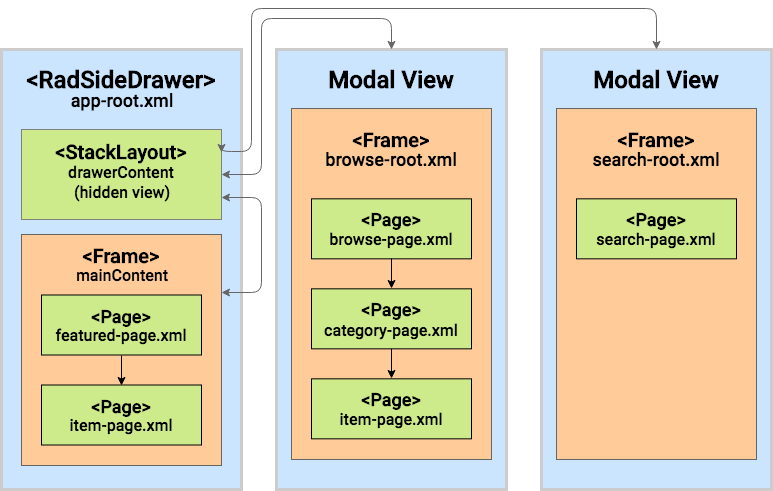
<nsDrawer:RadSideDrawer xmlns:nsDrawer="nativescript-ui-sidedrawer">
    <nsDrawer:RadSideDrawer.drawerContent>
        <StackLayout>
            <Label text="Featured" tap="resetFeatured" />
            <Label text="Browse" tap="openBrowseModal" />
            <Label text="Search" tap="openSearchModal" />
        </StackLayout>
    </nsDrawer:RadSideDrawer.drawerContent>

    <nsDrawer:RadSideDrawer.mainContent>
        <Frame id="featured" defaultPage="featured-page" />
    </nsDrawer:RadSideDrawer.mainContent>
</nsDrawer:RadSideDrawer>
import { Application, Frame } from "@nativescript/core";

export function resetFeatured(args) {
    const sideDrawer = Application.getRootView();
    const featuredFrame = Frame.getFrameById("featured");
    featuredFrame.navigate({
        moduleName: "featured-page",
        clearHistory: true
    });
    sideDrawer.closeDrawer();
}

export function openBrowseModal(args) {
    const sideDrawer = Application.getRootView();
    const view = args.object;
    const context = null;
    const closeCallback = null;
    const fullscreen = true;
    view.showModal("browse-root", context, closeCallback, fullscreen);
    sideDrawer.closeDrawer();
}

export function openSearchModal(args) {
    const sideDrawer = Application.getRootView();
    const view = args.object;
    const context = null;
    const closeCallback = null;
    const fullscreen = true;
    view.showModal("search-root", context, closeCallback, fullscreen);
    sideDrawer.closeDrawer();
}
import { RadSideDrawer } from "nativescript-ui-sidedrawer";
import { Application, Frame, View, EventData } from "@nativescript/core";

export function resetFeatured(args: EventData) {
    const sideDrawer: RadSideDrawer = <RadSideDrawer>Application.getRootView();
    const featuredFrame = Frame.getFrameById("featured");
    featuredFrame.navigate({
        moduleName: "featured-page",
        clearHistory: true
    });
    sideDrawer.closeDrawer();
}

export function openBrowseModal(args: EventData) {
    const sideDrawer: RadSideDrawer = <RadSideDrawer>Application.getRootView();
    const view: View = <View>args.object;
    const context = null;
    const closeCallback = null;
    const fullscreen = true;
    view.showModal("browse-root", null, null, true);
    sideDrawer.closeDrawer();
}

export function openSearchModal(args: EventData) {
    const sideDrawer: RadSideDrawer = <RadSideDrawer>Application.getRootView();
    const view: View = <View>args.object;
    const context = null;
    const closeCallback = null;
    const fullscreen = true;
    view.showModal("search-root", null, null, true);
    sideDrawer.closeDrawer();
}
Take a look at the SideDrawer docs for more information about the component.